Sung-Mahi Outposts
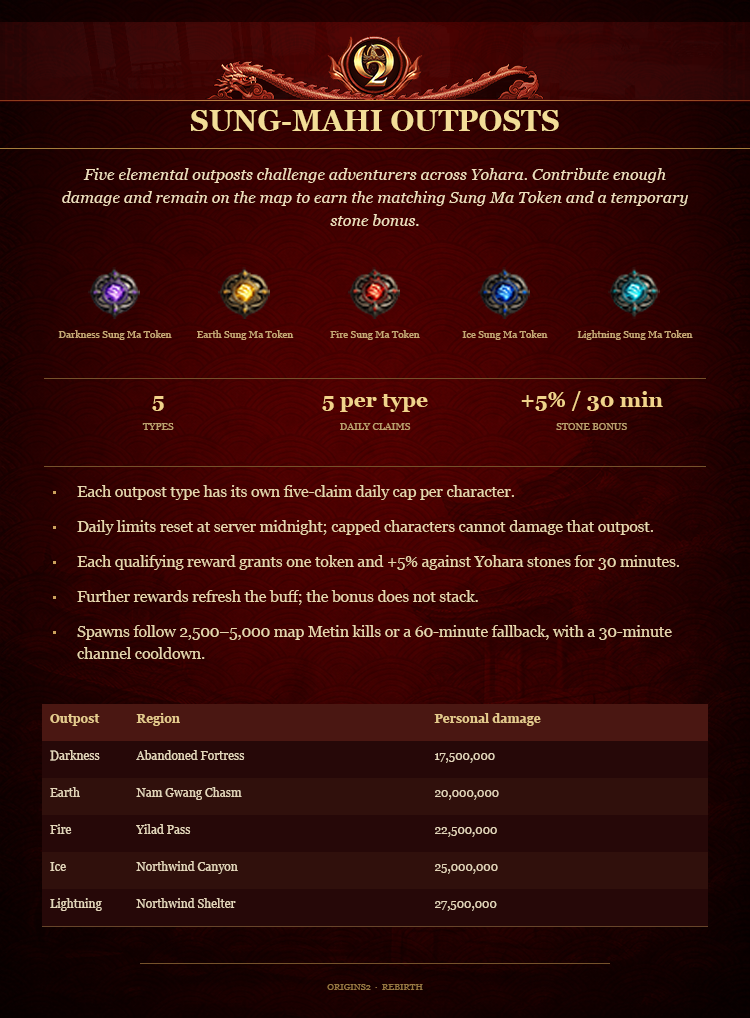
Five elemental outposts challenge adventurers across Yohara. Contribute enough damage and remain on the map to earn the matching Sung Ma Token and a temporary stone bonus.
- Types
- 5
- Daily claims
- 5 per type
- Stone bonus
- +5% / 30 min
- Each outpost type has its own five-claim daily cap per character.
- Daily limits reset at server midnight; capped characters cannot damage that outpost.
- Each qualifying reward grants one token and +5% against Yohara stones for 30 minutes.
- Further rewards refresh the buff; the bonus does not stack.
- Spawns follow 2,500–5,000 map Metin kills or a 60-minute fallback, with a 30-minute channel cooldown.
| Outpost | Region | Personal damage |
|---|
| Darkness | Abandoned Fortress | 17,500,000 |
| Earth | Nam Gwang Chasm | 20,000,000 |
| Fire | Yilad Pass | 22,500,000 |
| Ice | Northwind Canyon | 25,000,000 |
| Lightning | Northwind Shelter | 27,500,000 |
Re-entry & Cooldown Resets
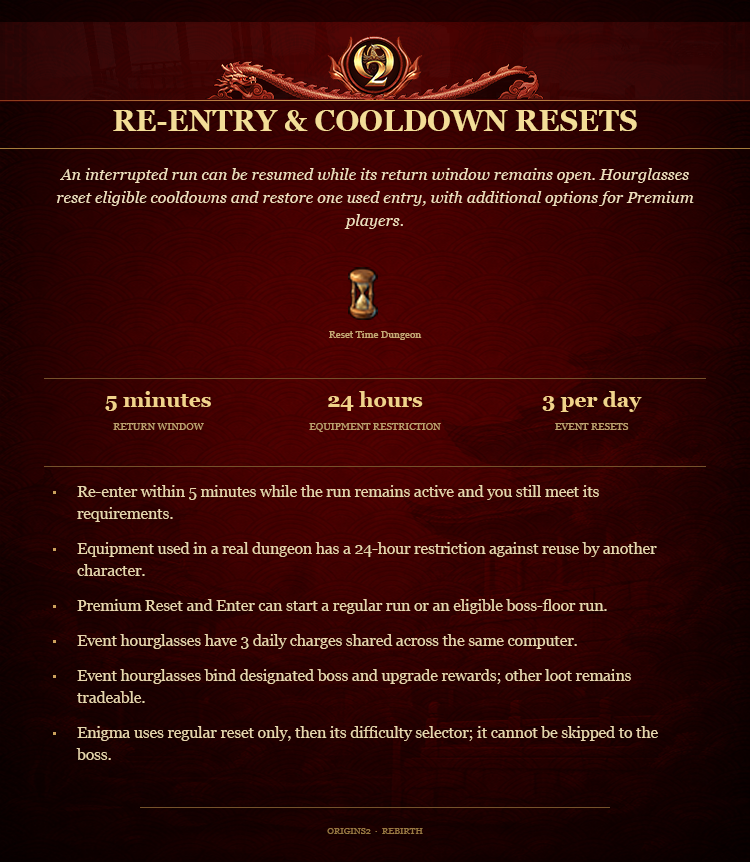
An interrupted run can be resumed while its return window remains open. Hourglasses reset eligible cooldowns and restore one used entry, with additional options for Premium players.
- Return window
- 5 minutes
- Equipment restriction
- 24 hours
- Event resets
- 3 per day
- Re-enter within 5 minutes while the run remains active and you still meet its requirements.
- Equipment used in a real dungeon has a 24-hour restriction against reuse by another character.
- Premium Reset and Enter can start a regular run or an eligible boss-floor run.
- Event hourglasses have 3 daily charges shared across the same computer.
- Event hourglasses bind designated boss and upgrade rewards; other loot remains tradeable.
- Enigma uses regular reset only, then its difficulty selector; it cannot be skipped to the boss.

CHOOSE YOUR NEXT CHALLENGE
Explore the dungeons
Select a dungeon to discover its rules, rewards and requirements.Dungeon Information30 dungeons
DUNGEON GUIDEOtherworld Daily
A daily solo challenge for levels 30 to 120, with tickets that follow your progression. Its daily entry and cooldown refresh together at server midnight.
- Level
- 30–120
- Players
- Solo
- Cooldown
- Server midnight
- Time limit
- 60 minutes
- Base daily entries
- 1 character / 1 device
- Ticket
- 1 × progression-band ticket
- Damage bonuses
- Bosses
- Resistance
- Fire
Inside the dungeon
- Daily entry and cooldown reset together at server midnight.
- Your ticket follows your level, switching to Elemental after accepting that progression.
- Regular cooldown and limit events do not modify this daily reset.
- No fixed equipment checklist is assigned to this dungeon.
Link to this dungeon ↗
DUNGEON GUIDEMonkey Dungeon
Begin your dungeon progression with a solo challenge for levels 30 to 55. Bring a Beginner Dungeon Ticket and prepare your animal and boss damage bonuses.
- Level
- 30–55
- Players
- Solo
- Cooldown
- 15 minutes
- Time limit
- 30 minutes
- Base daily entries
- 6 character / 6 device
- Ticket
- 1 × Beginner Dungeon Ticket
- Damage bonuses
- Animals, Bosses
- Resistance
- Earth
Inside the dungeon
- No fixed equipment checklist is assigned to this dungeon.
- The daily cap is checked for both your character and shared device identity.
- Active bonuses and game mode can adjust the displayed daily limit.
- Return to an interrupted active run within 5 minutes if you still qualify.
- Open the Dungeon panel to inspect current drops, requirements and rankings.
Link to this dungeon ↗
DUNGEON GUIDESpider Queen's Nest
Face the Spider Queen's Nest alone between levels 55 and 80. Prepare animal and boss damage, check your wind resistance and carry a Beginner Dungeon Ticket.
- Level
- 55–80
- Players
- Solo
- Cooldown
- 15 minutes
- Time limit
- 60 minutes
- Base daily entries
- 6 character / 6 device
- Ticket
- 1 × Beginner Dungeon Ticket
- Damage bonuses
- Animals, Bosses
- Resistance
- Wind
Inside the dungeon
- No fixed equipment checklist is assigned to this dungeon.
- The daily cap is checked for both your character and shared device identity.
- Active bonuses and game mode can adjust the displayed daily limit.
- Return to an interrupted active run within 5 minutes if you still qualify.
- Open the Dungeon panel to inspect current drops, requirements and rankings.
Link to this dungeon ↗
DUNGEON GUIDEPrehistoric Dungeon
Explore the Prehistoric Dungeon alone between levels 55 and 80. Use a Beginner Dungeon Ticket and prepare animal and boss damage with fire resistance for the encounter.
- Level
- 55–80
- Players
- Solo
- Cooldown
- 15 minutes
- Time limit
- 60 minutes
- Base daily entries
- 6 character / 6 device
- Ticket
- 1 × Beginner Dungeon Ticket
- Damage bonuses
- Animals, Bosses
- Resistance
- Fire
Inside the dungeon
- No fixed equipment checklist is assigned to this dungeon.
- The daily cap is checked for both your character and shared device identity.
- Active bonuses and game mode can adjust the displayed daily limit.
- Return to an interrupted active run within 5 minutes if you still qualify.
- Open the Dungeon panel to inspect current drops, requirements and rankings.
Link to this dungeon ↗
DUNGEON GUIDEDemon Tower
Take on the Demon Tower alone between levels 55 and 80. Prepare undead and boss damage, dark resistance and a Beginner Dungeon Ticket before entering.
- Level
- 55–80
- Players
- Solo
- Cooldown
- 20 minutes
- Time limit
- 60 minutes
- Base daily entries
- 6 character / 6 device
- Ticket
- 1 × Beginner Dungeon Ticket
- Damage bonuses
- Undead, Bosses
- Resistance
- Darkness
Inside the dungeon
- No fixed equipment checklist is assigned to this dungeon.
- The daily cap is checked for both your character and shared device identity.
- Active bonuses and game mode can adjust the displayed daily limit.
- Return to an interrupted active run within 5 minutes if you still qualify.
- Open the Dungeon panel to inspect current drops, requirements and rankings.
Link to this dungeon ↗
DUNGEON GUIDEDevil's Catacomb
Descend into the Devil's Catacomb alone between levels 75 and 95. Bring an Intermediate Dungeon Ticket and prepare undead and boss damage with dark resistance.
- Level
- 75–95
- Players
- Solo
- Cooldown
- 30 minutes
- Time limit
- 60 minutes
- Base daily entries
- 6 character / 6 device
- Ticket
- 1 × Intermediate Dungeon Ticket
- Damage bonuses
- Undead, Bosses
- Resistance
- Darkness
Inside the dungeon
- No fixed equipment checklist is assigned to this dungeon.
- The daily cap is checked for both your character and shared device identity.
- Active bonuses and game mode can adjust the displayed daily limit.
- Return to an interrupted active run within 5 minutes if you still qualify.
- Open the Dungeon panel to inspect current drops, requirements and rankings.
Link to this dungeon ↗
DUNGEON GUIDEDragon's Temple
Enter the Dragon's Temple alone between levels 75 and 95. An Intermediate Dungeon Ticket opens this challenge, with devil and boss damage and lightning resistance highlighted.
- Level
- 75–95
- Players
- Solo
- Cooldown
- 30 minutes
- Time limit
- 60 minutes
- Base daily entries
- 6 character / 6 device
- Ticket
- 1 × Intermediate Dungeon Ticket
- Damage bonuses
- Devils, Bosses
- Resistance
- Lightning
Inside the dungeon
- No fixed equipment checklist is assigned to this dungeon.
- The daily cap is checked for both your character and shared device identity.
- Active bonuses and game mode can adjust the displayed daily limit.
- Return to an interrupted active run within 5 minutes if you still qualify.
- Open the Dungeon panel to inspect current drops, requirements and rankings.
Link to this dungeon ↗
DUNGEON GUIDERed Dragon Fortress
Challenge the Red Dragon Fortress alone between levels 90 and 110. Prepare fire resistance, satisfy the equipment checklist and bring an Advanced Dungeon Ticket for entry.
- Level
- 90–110
- Players
- Solo
- Cooldown
- 30 minutes
- Time limit
- 60 minutes
- Base daily entries
- 6 character / 6 device
- Ticket
- 1 × Advanced Dungeon Ticket
- Damage bonuses
- Bosses
- Resistance
- Fire
Inside the dungeon
- Required: Fire Talisman +30 and an accepted Ring of Joy or event-ring alternative.
- Weapon roots include Poison Sword +9 and matching class alternatives.
- Blue Steel-tier armour and Soul Crystal-tier accessories start at +6.
- Accepted Beginner equipment alternatives appear in the equipment panel.
- Equipment used in real dungeons has a 24-hour character restriction.
Link to this dungeon ↗
DUNGEON GUIDENemere's Watchtower
Enter Nemere's Watchtower alone between levels 90 and 110. Check your ice resistance and required equipment before using an Advanced Dungeon Ticket to begin the challenge.
- Level
- 90–110
- Players
- Solo
- Cooldown
- 30 minutes
- Time limit
- 60 minutes
- Base daily entries
- 6 character / 6 device
- Ticket
- 1 × Advanced Dungeon Ticket
- Damage bonuses
- Bosses
- Resistance
- Ice
Inside the dungeon
- Required: Ice Talisman +30 and an accepted Ring of Joy or event-ring alternative.
- Weapon roots include Poison Sword +9 and matching class alternatives.
- Blue Steel-tier armour and Soul Crystal-tier accessories start at +6.
- Accepted Beginner equipment alternatives appear in the equipment panel.
- Equipment used in real dungeons has a 24-hour character restriction.
Link to this dungeon ↗
DUNGEON GUIDEPlague Dungeon
Take on the Plague Dungeon alone between levels 90 and 110. Prepare earth resistance, meet the equipment checklist and carry an Advanced Dungeon Ticket for entry.
- Level
- 90–110
- Players
- Solo
- Cooldown
- 30 minutes
- Time limit
- 60 minutes
- Base daily entries
- 6 character / 6 device
- Ticket
- 1 × Advanced Dungeon Ticket
- Damage bonuses
- Bosses
- Resistance
- Earth
Inside the dungeon
- Required: Earth Talisman +30 and an accepted Ring of Joy or event-ring alternative.
- Weapon roots include Poison Sword +9 and matching class alternatives.
- Blue Steel-tier armour and Soul Crystal-tier accessories start at +6.
- Accepted Beginner equipment alternatives appear in the equipment panel.
- Equipment used in real dungeons has a 24-hour character restriction.
Link to this dungeon ↗
DUNGEON GUIDEJotun Thrym
Challenge Jotun Thrym alone between levels 105 and 120. Prepare your earth talisman, equipment and passive skills before committing to the next stage of progression.
- Level
- 105–120
- Players
- Solo
- Cooldown
- 45 minutes
- Time limit
- 60 minutes
- Base daily entries
- 6 character / 6 device
- Ticket
- 1 × Expert Dungeon Ticket
- Damage bonuses
- Bosses
- Resistance
- Earth
Inside the dungeon
- Required: Earth Talisman +40, at least 19% sash absorption and an accepted ring.
- Devil's Horn-tier armour, helmets and Tourmaline-tier accessories start at +5.
- Leadership, Scales Of Dragon and Soul Of Dragon must all be P.
- Weapon roots include Poison Sword +9 and matching class alternatives.
- Accepting Elemental progression permanently closes access to this dungeon.
Link to this dungeon ↗
DUNGEON GUIDEShip Defence
Defend the ship in a solo challenge for levels 105 to 120. Prepare lightning resistance and the required equipment before using an Expert Dungeon Ticket.
- Level
- 105–120
- Players
- Solo
- Cooldown
- 45 minutes
- Time limit
- 60 minutes
- Base daily entries
- 6 character / 6 device
- Ticket
- 1 × Expert Dungeon Ticket
- Damage bonuses
- Bosses
- Resistance
- Lightning
Inside the dungeon
- Required: Lightning Talisman +40, at least 19% sash absorption and an accepted ring.
- Devil's Horn-tier armour, helmets and Tourmaline-tier accessories start at +5.
- Leadership, Scales Of Dragon and Soul Of Dragon must all be P.
- Weapon roots include Poison Sword +9 and matching class alternatives.
- Accepting Elemental progression permanently closes access to this dungeon.
Link to this dungeon ↗
DUNGEON GUIDEMeley's Lair
Enter Meley's Lair alone between levels 105 and 120. Prepare fire resistance, satisfy the equipment checklist and bring an Expert Dungeon Ticket for the challenge.
- Level
- 105–120
- Players
- Solo
- Cooldown
- 45 minutes
- Time limit
- 60 minutes
- Base daily entries
- 6 character / 6 device
- Ticket
- 1 × Expert Dungeon Ticket
- Damage bonuses
- Bosses
- Resistance
- Fire
Inside the dungeon
- Required: Fire Talisman +40, at least 19% sash absorption and an accepted ring.
- Devil's Horn-tier armour, helmets and Tourmaline-tier accessories start at +5.
- Leadership, Scales Of Dragon and Soul Of Dragon must all be P.
- Weapon roots include Poison Sword +9 and matching class alternatives.
- Accepting Elemental progression permanently closes access to this dungeon.
Link to this dungeon ↗
DUNGEON GUIDESung Mahi Tower
Challenge Sung Mahi Tower alone between levels 105 and 120. Prepare dark resistance, the required equipment and an Expert Dungeon Ticket before starting your run.
- Level
- 105–120
- Players
- Solo
- Cooldown
- 45 minutes
- Time limit
- 60 minutes
- Base daily entries
- 6 character / 6 device
- Ticket
- 1 × Expert Dungeon Ticket
- Damage bonuses
- Bosses
- Resistance
- Darkness
Inside the dungeon
- Required: Dark Talisman +40, at least 19% sash absorption and an accepted ring.
- Devil's Horn-tier armour, helmets and Tourmaline-tier accessories start at +5.
- Leadership, Scales Of Dragon and Soul Of Dragon must all be P.
- Weapon roots include Poison Sword +9 and matching class alternatives.
- Accepting Elemental progression permanently closes access to this dungeon.
Link to this dungeon ↗
DUNGEON GUIDESerpent Temple
Enter the Serpent Temple at level 120 with a Master Dungeon Ticket. Prepare your earth talisman and Gloom Dragon equipment before advancing into Yohara progression.
- Level
- 120
- Players
- Solo
- Cooldown
- 45 minutes
- Time limit
- 60 minutes
- Base daily entries
- 6 character / 6 device
- Ticket
- 1 × Master Dungeon Ticket
- Damage bonuses
- Bosses
- Resistance
- Earth
Inside the dungeon
- Required: Earth Talisman +50, Sparkling Aura and at least 25% sash absorption.
- Gloom Dragon weapons, armour, helmets and accessories start at +5.
- Activate a Master Energy Crystal and wear an accepted ring.
- Leadership, Scales Of Dragon and Soul Of Dragon must all be P.
- Using the Champion 1 Yohara key permanently closes this dungeon.
Link to this dungeon ↗
DUNGEON GUIDEZodiac Temple
Challenge the Zodiac Temple at level 120 with a Master Dungeon Ticket. Prepare your wind talisman and Gloom Dragon equipment, and review your progression access.
- Level
- 120
- Players
- Solo
- Cooldown
- 45 minutes
- Time limit
- 60 minutes
- Base daily entries
- 6 character / 6 device
- Ticket
- 1 × Master Dungeon Ticket
- Damage bonuses
- Bosses
- Resistance
- Wind
Inside the dungeon
- Required: Wind Talisman +50, Sparkling Aura and at least 25% sash absorption.
- Gloom Dragon weapons, armour, helmets and accessories start at +5.
- Activate a Master Energy Crystal and wear an accepted ring.
- Leadership, Scales Of Dragon and Soul Of Dragon must all be P.
- Using the Champion 10 Yohara key permanently closes this dungeon.
Link to this dungeon ↗
DUNGEON GUIDEAlastor
Challenge Alastor at level 120, either alone or with a Party Finder partner. Prepare ice resistance, meet the equipment requirements and bring the correct ticket.
- Level
- 120
- Players
- Solo; Party Finder Duo
- Cooldown
- 45 minutes
- Time limit
- 60 minutes
- Base daily entries
- 6 character / 6 device
- Ticket
- 1 × Master Dungeon Ticket
- Damage bonuses
- Bosses
- Resistance
- Ice
Inside the dungeon
- Required: Ice Talisman +50, Sparkling Aura and at least 25% sash absorption.
- Gloom Dragon weapons, armour, helmets and accessories start at +5.
- Activate a Master Energy Crystal and wear an accepted ring.
- Leadership, Scales Of Dragon and Soul Of Dragon must all be P.
- Using the Champion 20 Yohara key permanently closes this dungeon.
- Party Finder Duo is available; both players need their own Master Dungeon Ticket.
Link to this dungeon ↗
DUNGEON GUIDEBalathor
Enter Balathor at level 120 with a Master Dungeon Ticket. Prepare ice resistance and the required equipment, and consider the access changes from Yohara progression.
- Level
- 120
- Players
- Solo
- Cooldown
- 45 minutes
- Time limit
- 60 minutes
- Base daily entries
- 6 character / 6 device
- Ticket
- 1 × Master Dungeon Ticket
- Damage bonuses
- Bosses
- Resistance
- Ice
Inside the dungeon
- Required: Ice Talisman +50, Sparkling Aura and at least 25% sash absorption.
- Gloom Dragon weapons, armour, helmets and accessories start at +5.
- Activate a Master Energy Crystal and wear an accepted ring.
- Leadership, Scales Of Dragon and Soul Of Dragon must all be P.
- Using the Champion 30 Yohara key permanently closes this dungeon.
Link to this dungeon ↗
DUNGEON GUIDEHalloween Dungeon
A Halloween solo dungeon for levels 30 to 120, available during its event. Your level determines which Halloween Dungeon Ticket is needed for the run.
- Level
- 30–120
- Players
- Solo
- Cooldown
- 45 minutes
- Time limit
- 60 minutes
- Base daily entries
- 6 character / 6 device
- Ticket
- 1 × matching event-band ticket
- Damage bonuses
- Bosses
- Resistance
- Fire
Inside the dungeon
- Available when the corresponding seasonal dungeon event is enabled.
- Your ticket and encounter band follow your level and, where applicable, Elemental progress.
- No fixed equipment checklist is assigned to this dungeon.
- Check the event dungeon panel for the active reward preview.
Link to this dungeon ↗
DUNGEON GUIDENaga Dungeon
Take on the Naga Dungeon alone at level 120. This challenge requires three Master Dungeon Tickets, stronger Zodiac equipment and the active items shown in its checklist.
- Level
- 120
- Players
- Solo
- Cooldown
- 45 minutes
- Time limit
- 60 minutes
- Base daily entries
- 6 character / 6 device
- Ticket
- 3 × Master Dungeon Ticket
- Damage bonuses
- Bosses
- Resistance
- Earth
Inside the dungeon
- Entry consumes 3 Master Dungeon Tickets.
- Zodiac weapons and armour start at +8; Gloom Dragon accessories at +9.
- Required: Elemental Talisman +8, Radiant Aura and at least 25% sash absorption.
- Wear an accepted ring plus Rebirth Ring and activate a Mythic Energy Crystal.
- Penetrate must be P.
Link to this dungeon ↗
DUNGEON GUIDEElemental Realm
Explore six elemental floors at level 120. Select an unlocked floor, meet its equipment requirements and choose between further progression and facing that floor's boss.
- Level
- 120
- Players
- Solo
- Cooldown
- 45 minutes
- Time limit
- 60 minutes
- Base daily entries
- 6 character / 6 device
- Ticket
- 1 × Elemental Dungeon Ticket
- Damage bonuses
- Bosses
- Resistance
- Ice
Inside the dungeon
- Accept Elemental progression before accessing the realm.
- Ice entry requires Zodiac weapons and armour +9, with Zodiac accessories +0.
- Required: Elemental Talisman +9, Radiant Aura and at least 25% sash absorption.
- Wear an accepted elemental ring plus Rebirth Ring and activate a Legendary Energy Crystal.
- Penetrate must be P and Elemental Stone Bonus at least M1.
- Later floors have their own stronger equipment and skill checks.
Link to this dungeon ↗
DUNGEON GUIDEChristmas Dungeon
A Christmas solo dungeon for levels 30 to 120, available during its event. Your level determines which Christmas Dungeon Ticket is needed for the run.
- Level
- 30–120
- Players
- Solo
- Cooldown
- 45 minutes
- Time limit
- 60 minutes
- Base daily entries
- 6 character / 6 device
- Ticket
- 1 × matching event-band ticket
- Damage bonuses
- Bosses
- Resistance
- Ice
Inside the dungeon
- Available when the corresponding seasonal dungeon event is enabled.
- Your ticket and encounter band follow your level and, where applicable, Elemental progress.
- No fixed equipment checklist is assigned to this dungeon.
- Check the event dungeon panel for the active reward preview.
Link to this dungeon ↗
DUNGEON GUIDEEaster Dungeon
An Easter solo dungeon for levels 30 to 120, available during its event. Your level and Elemental progression determine the matching event ticket for entry.
- Level
- 30–120
- Players
- Solo
- Cooldown
- 45 minutes
- Time limit
- 60 minutes
- Base daily entries
- 6 character / 6 device
- Ticket
- 1 × matching event-band ticket
- Damage bonuses
- Bosses
- Resistance
- Earth
Inside the dungeon
- Available when the corresponding seasonal dungeon event is enabled.
- Your ticket and encounter band follow your level and, where applicable, Elemental progress.
- No fixed equipment checklist is assigned to this dungeon.
- Check the event dungeon panel for the active reward preview.
Link to this dungeon ↗
DUNGEON GUIDEEnigma Dungeon
Choose Easy, Medium, Hard or Master and face six trials of combat and timing. Each difficulty has its own equipment check, ticket, rewards and rankings.
- Level
- 90–120; Master 120
- Players
- Solo; up to 8 when enabled
- Cooldown
- Server midnight
- Time limit
- 60 minutes
- Base daily entries
- 1 character / 1 device
- Ticket
- 1 × matching difficulty ticket
- Damage bonuses
- Humans
- Resistance
- Human
Inside the dungeon
- Daily reset is at server midnight; mounts and boss skips are disabled. Master requires level 120.
- HP-recovery items cannot be used during the duel; the third duel loss ends the run.
- Four circle rounds require standing in each circle for 5 seconds.
- PvM and normal-hit damage bonuses, HP steal and the HP-regeneration bonus are suppressed.
- Monster damage resistance is suppressed; alchemy is not completely disabled.
- Party entry supports up to 8 when enabled; only the leader consumes the ticket.
Link to this dungeon ↗
DUNGEON GUIDEWorld Cup 2026 Dungeon
A World Cup 2026 solo dungeon for levels 30 to 120, available during its event. Entry tickets follow your level and Elemental progression band.
- Level
- 30–120
- Players
- Solo
- Cooldown
- 45 minutes
- Time limit
- 60 minutes
- Base daily entries
- 6 character / 6 device
- Ticket
- 1 × matching event-band ticket
- Damage bonuses
- Bosses
- Resistance
- Earth
Inside the dungeon
- Available when the corresponding seasonal dungeon event is enabled.
- Your ticket and encounter band follow your level and, where applicable, Elemental progress.
- No fixed equipment checklist is assigned to this dungeon.
- Check the event dungeon panel for the active reward preview.
Link to this dungeon ↗
DUNGEON GUIDESummer Dungeon
A summer solo dungeon for levels 30 to 120, available during its event. Bring the event ticket matching your level and Elemental progression before entering.
- Level
- 30–120
- Players
- Solo
- Cooldown
- 45 minutes
- Time limit
- 60 minutes
- Base daily entries
- 6 character / 6 device
- Ticket
- 1 × matching event-band ticket
- Damage bonuses
- Bosses
- Resistance
- Earth
Inside the dungeon
- Available when the corresponding seasonal dungeon event is enabled.
- Your ticket and encounter band follow your level and, where applicable, Elemental progress.
- No fixed equipment checklist is assigned to this dungeon.
- Check the event dungeon panel for the active reward preview.
Link to this dungeon ↗
DUNGEON GUIDEAbyss of Shadows
Enter the Abyss after unlocking Abandoned Fortress. Identify false stones, close guarded portals and stop an intruder before challenging the Emperor of the Abyss and his healers.
- Level
- Champion 1–30
- Players
- Solo or exactly 2
- Cooldown
- 45 minutes
- Time limit
- 60 minutes
- Base daily entries
- 6 character / 6 device
- Ticket
- 1 × Yohara Dungeon Ticket
- Damage bonuses
- Bosses
- Resistance
- Darkness
- Unlock
- Abandoned Fortress
Inside the dungeon
- Requires Abandoned Fortress access; Solo or exactly 2 players.
- Find 3 real stones among 5, close 4 portals and stop the intruder within its 45-second route.
- The moving shadow zone applies -50% outgoing damage for 10 seconds after a 2-second dwell.
- The Emperor locks phases at 75% and 50%; each healer restores 2% every 5 seconds.
- Use the Solo or Duo equipment checklist before entering.
- View the final boss's upgrade materials and current rewards in the drop preview.
Link to this dungeon ↗
DUNGEON GUIDEStorm Sanctuary
Enter Storm Sanctuary after unlocking Nam Gwang. Follow the compass, attack shifting stones and protect the Wind Warrior before the Stormhide Colossus unleashes guardians and pursuing tornadoes.
- Level
- Champion 10–30
- Players
- Solo or exactly 2
- Cooldown
- 45 minutes
- Time limit
- 60 minutes
- Base daily entries
- 6 character / 6 device
- Ticket
- 1 × Yohara Dungeon Ticket
- Damage bonuses
- Bosses
- Resistance
- Wind
- Unlock
- Nam Gwang
Inside the dungeon
- Requires Nam Gwang access; Solo or exactly 2 players.
- Four compass objectives lead to wind crystals, hunting circles and shifting stones.
- Shifting stones share 14 million base HP and change target every 5 seconds.
- Protect the Wind Warrior for 45 seconds; final phases start at 75% and 50% boss HP.
- Use the Solo or Duo equipment checklist before entering.
- View the final boss's upgrade materials and current rewards in the drop preview.
Link to this dungeon ↗
DUNGEON GUIDEHeart of the Earth
Enter the Heart of the Earth after unlocking Yilad Pass. Remember coloured seals, break the Golem Leader's armour and defeat the Ancient Earth Guardian through its crystal and bodyguard phases.
- Level
- Champion 20–30
- Players
- Solo or exactly 2
- Cooldown
- 45 minutes
- Time limit
- 60 minutes
- Base daily entries
- 6 character / 6 device
- Ticket
- 1 × Yohara Dungeon Ticket
- Damage bonuses
- Bosses
- Resistance
- Earth
- Unlock
- Yilad Pass
Inside the dungeon
- Requires Yilad Pass access; Solo or exactly 2 players.
- Memorise 4 coloured seals; after two failed attempts, defeat the final penalty wave to advance.
- Break the Golem Leader's armour, then follow the marked guardian as it changes every 10 seconds.
- At 75% HP, identify 4 real crystals among 5; the fake costs 50% of your maximum HP.
- Use the Solo or Duo equipment checklist before entering.
- View the final boss's upgrade materials and current rewards in the drop preview.
Link to this dungeon ↗
DUNGEON GUIDECitadel of Frost
Enter the Citadel after unlocking Northwind Canyon. Keep warm, fire the cannons and protect the Ice Warrior before confronting the Frost Guardian King's chains, reflections and curses.
- Level
- Champion 30
- Players
- Solo or exactly 2
- Cooldown
- 45 minutes
- Time limit
- 60 minutes
- Base daily entries
- 6 character / 6 device
- Ticket
- 1 × Yohara Dungeon Ticket
- Damage bonuses
- Bosses
- Resistance
- Ice
- Unlock
- Northwind Canyon
Inside the dungeon
- Requires Northwind Canyon access; Solo or exactly 2 players.
- Campfire warmth restores 4 temperature per second; outside it, temperature falls by 2.
- Use 2 cannon charges, protect the Ice Warrior for 59 seconds and break the throne stones in order.
- Final phases use chains, 2 reflections at 75% HP, then curses at 50% and 25%.
- Use the Solo or Duo equipment checklist before entering.
- View the final boss's upgrade materials and current rewards in the drop preview.
Link to this dungeon ↗Otherworld Daily A daily solo challenge for levels 30 to 120, with tickets that follow your progression. Its daily entry and cooldown refresh together at server midnight. Daily entry and cooldown reset together at server midnight. Your ticket follows your level, switching to Elemental after accepting that progression. Regular cooldown and limit events do not modify this daily reset. No fixed equipment checklist is assigned to this dungeon. Level 30–120 Players Solo Cooldown Server midnight Time limit 60 minutes Base daily entries 1 character / 1 device Ticket 1 × progression-band ticket Damage bonuses Bosses Resistance Fire Monkey Dungeon Begin your dungeon progression with a solo challenge for levels 30 to 55. Bring a Beginner Dungeon Ticket and prepare your animal and boss damage bonuses. No fixed equipment checklist is assigned to this dungeon. The daily cap is checked for both your character and shared device identity. Active bonuses and game mode can adjust the displayed daily limit. Return to an interrupted active run within 5 minutes if you still qualify. Open the Dungeon panel to inspect current drops, requirements and rankings. Level 30–55 Players Solo Cooldown 15 minutes Time limit 30 minutes Base daily entries 6 character / 6 device Ticket 1 × Beginner Dungeon Ticket Damage bonuses Animals, Bosses Resistance Earth Spider Queen's Nest Face the Spider Queen's Nest alone between levels 55 and 80. Prepare animal and boss damage, check your wind resistance and carry a Beginner Dungeon Ticket. No fixed equipment checklist is assigned to this dungeon. The daily cap is checked for both your character and shared device identity. Active bonuses and game mode can adjust the displayed daily limit. Return to an interrupted active run within 5 minutes if you still qualify. Open the Dungeon panel to inspect current drops, requirements and rankings. Level 55–80 Players Solo Cooldown 15 minutes Time limit 60 minutes Base daily entries 6 character / 6 device Ticket 1 × Beginner Dungeon Ticket Damage bonuses Animals, Bosses Resistance Wind Prehistoric Dungeon Explore the Prehistoric Dungeon alone between levels 55 and 80. Use a Beginner Dungeon Ticket and prepare animal and boss damage with fire resistance for the encounter. No fixed equipment checklist is assigned to this dungeon. The daily cap is checked for both your character and shared device identity. Active bonuses and game mode can adjust the displayed daily limit. Return to an interrupted active run within 5 minutes if you still qualify. Open the Dungeon panel to inspect current drops, requirements and rankings. Level 55–80 Players Solo Cooldown 15 minutes Time limit 60 minutes Base daily entries 6 character / 6 device Ticket 1 × Beginner Dungeon Ticket Damage bonuses Animals, Bosses Resistance Fire Demon Tower Take on the Demon Tower alone between levels 55 and 80. Prepare undead and boss damage, dark resistance and a Beginner Dungeon Ticket before entering. No fixed equipment checklist is assigned to this dungeon. The daily cap is checked for both your character and shared device identity. Active bonuses and game mode can adjust the displayed daily limit. Return to an interrupted active run within 5 minutes if you still qualify. Open the Dungeon panel to inspect current drops, requirements and rankings. Level 55–80 Players Solo Cooldown 20 minutes Time limit 60 minutes Base daily entries 6 character / 6 device Ticket 1 × Beginner Dungeon Ticket Damage bonuses Undead, Bosses Resistance Darkness Devil's Catacomb Descend into the Devil's Catacomb alone between levels 75 and 95. Bring an Intermediate Dungeon Ticket and prepare undead and boss damage with dark resistance. No fixed equipment checklist is assigned to this dungeon. The daily cap is checked for both your character and shared device identity. Active bonuses and game mode can adjust the displayed daily limit. Return to an interrupted active run within 5 minutes if you still qualify. Open the Dungeon panel to inspect current drops, requirements and rankings. Level 75–95 Players Solo Cooldown 30 minutes Time limit 60 minutes Base daily entries 6 character / 6 device Ticket 1 × Intermediate Dungeon Ticket Damage bonuses Undead, Bosses Resistance Darkness Dragon's Temple Enter the Dragon's Temple alone between levels 75 and 95. An Intermediate Dungeon Ticket opens this challenge, with devil and boss damage and lightning resistance highlighted. No fixed equipment checklist is assigned to this dungeon. The daily cap is checked for both your character and shared device identity. Active bonuses and game mode can adjust the displayed daily limit. Return to an interrupted active run within 5 minutes if you still qualify. Open the Dungeon panel to inspect current drops, requirements and rankings. Level 75–95 Players Solo Cooldown 30 minutes Time limit 60 minutes Base daily entries 6 character / 6 device Ticket 1 × Intermediate Dungeon Ticket Damage bonuses Devils, Bosses Resistance Lightning Red Dragon Fortress Challenge the Red Dragon Fortress alone between levels 90 and 110. Prepare fire resistance, satisfy the equipment checklist and bring an Advanced Dungeon Ticket for entry. Required: Fire Talisman +30 and an accepted Ring of Joy or event-ring alternative. Weapon roots include Poison Sword +9 and matching class alternatives. Blue Steel-tier armour and Soul Crystal-tier accessories start at +6. Accepted Beginner equipment alternatives appear in the equipment panel. Equipment used in real dungeons has a 24-hour character restriction. Level 90–110 Players Solo Cooldown 30 minutes Time limit 60 minutes Base daily entries 6 character / 6 device Ticket 1 × Advanced Dungeon Ticket Damage bonuses Bosses Resistance Fire Nemere's Watchtower Enter Nemere's Watchtower alone between levels 90 and 110. Check your ice resistance and required equipment before using an Advanced Dungeon Ticket to begin the challenge. Required: Ice Talisman +30 and an accepted Ring of Joy or event-ring alternative. Weapon roots include Poison Sword +9 and matching class alternatives. Blue Steel-tier armour and Soul Crystal-tier accessories start at +6. Accepted Beginner equipment alternatives appear in the equipment panel. Equipment used in real dungeons has a 24-hour character restriction. Level 90–110 Players Solo Cooldown 30 minutes Time limit 60 minutes Base daily entries 6 character / 6 device Ticket 1 × Advanced Dungeon Ticket Damage bonuses Bosses Resistance Ice Plague Dungeon Take on the Plague Dungeon alone between levels 90 and 110. Prepare earth resistance, meet the equipment checklist and carry an Advanced Dungeon Ticket for entry. Required: Earth Talisman +30 and an accepted Ring of Joy or event-ring alternative. Weapon roots include Poison Sword +9 and matching class alternatives. Blue Steel-tier armour and Soul Crystal-tier accessories start at +6. Accepted Beginner equipment alternatives appear in the equipment panel. Equipment used in real dungeons has a 24-hour character restriction. Level 90–110 Players Solo Cooldown 30 minutes Time limit 60 minutes Base daily entries 6 character / 6 device Ticket 1 × Advanced Dungeon Ticket Damage bonuses Bosses Resistance Earth Jotun Thrym Challenge Jotun Thrym alone between levels 105 and 120. Prepare your earth talisman, equipment and passive skills before committing to the next stage of progression. Required: Earth Talisman +40, at least 19% sash absorption and an accepted ring. Devil's Horn-tier armour, helmets and Tourmaline-tier accessories start at +5. Leadership, Scales Of Dragon and Soul Of Dragon must all be P. Weapon roots include Poison Sword +9 and matching class alternatives. Accepting Elemental progression permanently closes access to this dungeon. Level 105–120 Players Solo Cooldown 45 minutes Time limit 60 minutes Base daily entries 6 character / 6 device Ticket 1 × Expert Dungeon Ticket Damage bonuses Bosses Resistance Earth Ship Defence Defend the ship in a solo challenge for levels 105 to 120. Prepare lightning resistance and the required equipment before using an Expert Dungeon Ticket. Required: Lightning Talisman +40, at least 19% sash absorption and an accepted ring. Devil's Horn-tier armour, helmets and Tourmaline-tier accessories start at +5. Leadership, Scales Of Dragon and Soul Of Dragon must all be P. Weapon roots include Poison Sword +9 and matching class alternatives. Accepting Elemental progression permanently closes access to this dungeon. Level 105–120 Players Solo Cooldown 45 minutes Time limit 60 minutes Base daily entries 6 character / 6 device Ticket 1 × Expert Dungeon Ticket Damage bonuses Bosses Resistance Lightning Meley's Lair Enter Meley's Lair alone between levels 105 and 120. Prepare fire resistance, satisfy the equipment checklist and bring an Expert Dungeon Ticket for the challenge. Required: Fire Talisman +40, at least 19% sash absorption and an accepted ring. Devil's Horn-tier armour, helmets and Tourmaline-tier accessories start at +5. Leadership, Scales Of Dragon and Soul Of Dragon must all be P. Weapon roots include Poison Sword +9 and matching class alternatives. Accepting Elemental progression permanently closes access to this dungeon. Level 105–120 Players Solo Cooldown 45 minutes Time limit 60 minutes Base daily entries 6 character / 6 device Ticket 1 × Expert Dungeon Ticket Damage bonuses Bosses Resistance Fire Sung Mahi Tower Challenge Sung Mahi Tower alone between levels 105 and 120. Prepare dark resistance, the required equipment and an Expert Dungeon Ticket before starting your run. Required: Dark Talisman +40, at least 19% sash absorption and an accepted ring. Devil's Horn-tier armour, helmets and Tourmaline-tier accessories start at +5. Leadership, Scales Of Dragon and Soul Of Dragon must all be P. Weapon roots include Poison Sword +9 and matching class alternatives. Accepting Elemental progression permanently closes access to this dungeon. Level 105–120 Players Solo Cooldown 45 minutes Time limit 60 minutes Base daily entries 6 character / 6 device Ticket 1 × Expert Dungeon Ticket Damage bonuses Bosses Resistance Darkness Serpent Temple Enter the Serpent Temple at level 120 with a Master Dungeon Ticket. Prepare your earth talisman and Gloom Dragon equipment before advancing into Yohara progression. Required: Earth Talisman +50, Sparkling Aura and at least 25% sash absorption. Gloom Dragon weapons, armour, helmets and accessories start at +5. Activate a Master Energy Crystal and wear an accepted ring. Leadership, Scales Of Dragon and Soul Of Dragon must all be P. Using the Champion 1 Yohara key permanently closes this dungeon. Level 120 Players Solo Cooldown 45 minutes Time limit 60 minutes Base daily entries 6 character / 6 device Ticket 1 × Master Dungeon Ticket Damage bonuses Bosses Resistance Earth Zodiac Temple Challenge the Zodiac Temple at level 120 with a Master Dungeon Ticket. Prepare your wind talisman and Gloom Dragon equipment, and review your progression access. Required: Wind Talisman +50, Sparkling Aura and at least 25% sash absorption. Gloom Dragon weapons, armour, helmets and accessories start at +5. Activate a Master Energy Crystal and wear an accepted ring. Leadership, Scales Of Dragon and Soul Of Dragon must all be P. Using the Champion 10 Yohara key permanently closes this dungeon. Level 120 Players Solo Cooldown 45 minutes Time limit 60 minutes Base daily entries 6 character / 6 device Ticket 1 × Master Dungeon Ticket Damage bonuses Bosses Resistance Wind Alastor Challenge Alastor at level 120, either alone or with a Party Finder partner. Prepare ice resistance, meet the equipment requirements and bring the correct ticket. Required: Ice Talisman +50, Sparkling Aura and at least 25% sash absorption. Gloom Dragon weapons, armour, helmets and accessories start at +5. Activate a Master Energy Crystal and wear an accepted ring. Leadership, Scales Of Dragon and Soul Of Dragon must all be P. Using the Champion 20 Yohara key permanently closes this dungeon. Party Finder Duo is available; both players need their own Master Dungeon Ticket. Level 120 Players Solo; Party Finder Duo Cooldown 45 minutes Time limit 60 minutes Base daily entries 6 character / 6 device Ticket 1 × Master Dungeon Ticket Damage bonuses Bosses Resistance Ice Balathor Enter Balathor at level 120 with a Master Dungeon Ticket. Prepare ice resistance and the required equipment, and consider the access changes from Yohara progression. Required: Ice Talisman +50, Sparkling Aura and at least 25% sash absorption. Gloom Dragon weapons, armour, helmets and accessories start at +5. Activate a Master Energy Crystal and wear an accepted ring. Leadership, Scales Of Dragon and Soul Of Dragon must all be P. Using the Champion 30 Yohara key permanently closes this dungeon. Level 120 Players Solo Cooldown 45 minutes Time limit 60 minutes Base daily entries 6 character / 6 device Ticket 1 × Master Dungeon Ticket Damage bonuses Bosses Resistance Ice Halloween Dungeon A Halloween solo dungeon for levels 30 to 120, available during its event. Your level determines which Halloween Dungeon Ticket is needed for the run. Available when the corresponding seasonal dungeon event is enabled. Your ticket and encounter band follow your level and, where applicable, Elemental progress. No fixed equipment checklist is assigned to this dungeon. Check the event dungeon panel for the active reward preview. Level 30–120 Players Solo Cooldown 45 minutes Time limit 60 minutes Base daily entries 6 character / 6 device Ticket 1 × matching event-band ticket Damage bonuses Bosses Resistance Fire Naga Dungeon Take on the Naga Dungeon alone at level 120. This challenge requires three Master Dungeon Tickets, stronger Zodiac equipment and the active items shown in its checklist. Entry consumes 3 Master Dungeon Tickets. Zodiac weapons and armour start at +8; Gloom Dragon accessories at +9. Required: Elemental Talisman +8, Radiant Aura and at least 25% sash absorption. Wear an accepted ring plus Rebirth Ring and activate a Mythic Energy Crystal. Penetrate must be P. Level 120 Players Solo Cooldown 45 minutes Time limit 60 minutes Base daily entries 6 character / 6 device Ticket 3 × Master Dungeon Ticket Damage bonuses Bosses Resistance Earth Elemental Realm Explore six elemental floors at level 120. Select an unlocked floor, meet its equipment requirements and choose between further progression and facing that floor's boss. Accept Elemental progression before accessing the realm. Ice entry requires Zodiac weapons and armour +9, with Zodiac accessories +0. Required: Elemental Talisman +9, Radiant Aura and at least 25% sash absorption. Wear an accepted elemental ring plus Rebirth Ring and activate a Legendary Energy Crystal. Penetrate must be P and Elemental Stone Bonus at least M1. Later floors have their own stronger equipment and skill checks. Level 120 Players Solo Cooldown 45 minutes Time limit 60 minutes Base daily entries 6 character / 6 device Ticket 1 × Elemental Dungeon Ticket Damage bonuses Bosses Resistance Ice Christmas Dungeon A Christmas solo dungeon for levels 30 to 120, available during its event. Your level determines which Christmas Dungeon Ticket is needed for the run. Available when the corresponding seasonal dungeon event is enabled. Your ticket and encounter band follow your level and, where applicable, Elemental progress. No fixed equipment checklist is assigned to this dungeon. Check the event dungeon panel for the active reward preview. Level 30–120 Players Solo Cooldown 45 minutes Time limit 60 minutes Base daily entries 6 character / 6 device Ticket 1 × matching event-band ticket Damage bonuses Bosses Resistance Ice Easter Dungeon An Easter solo dungeon for levels 30 to 120, available during its event. Your level and Elemental progression determine the matching event ticket for entry. Available when the corresponding seasonal dungeon event is enabled. Your ticket and encounter band follow your level and, where applicable, Elemental progress. No fixed equipment checklist is assigned to this dungeon. Check the event dungeon panel for the active reward preview. Level 30–120 Players Solo Cooldown 45 minutes Time limit 60 minutes Base daily entries 6 character / 6 device Ticket 1 × matching event-band ticket Damage bonuses Bosses Resistance Earth Enigma Dungeon Choose Easy, Medium, Hard or Master and face six trials of combat and timing. Each difficulty has its own equipment check, ticket, rewards and rankings. Daily reset is at server midnight; mounts and boss skips are disabled. Master requires level 120. HP-recovery items cannot be used during the duel; the third duel loss ends the run. Four circle rounds require standing in each circle for 5 seconds. PvM and normal-hit damage bonuses, HP steal and the HP-regeneration bonus are suppressed. Monster damage resistance is suppressed; alchemy is not completely disabled. Party entry supports up to 8 when enabled; only the leader consumes the ticket. Level 90–120; Master 120 Players Solo; up to 8 when enabled Cooldown Server midnight Time limit 60 minutes Base daily entries 1 character / 1 device Ticket 1 × matching difficulty ticket Damage bonuses Humans Resistance Human World Cup 2026 Dungeon A World Cup 2026 solo dungeon for levels 30 to 120, available during its event. Entry tickets follow your level and Elemental progression band. Available when the corresponding seasonal dungeon event is enabled. Your ticket and encounter band follow your level and, where applicable, Elemental progress. No fixed equipment checklist is assigned to this dungeon. Check the event dungeon panel for the active reward preview. Level 30–120 Players Solo Cooldown 45 minutes Time limit 60 minutes Base daily entries 6 character / 6 device Ticket 1 × matching event-band ticket Damage bonuses Bosses Resistance Earth Summer Dungeon A summer solo dungeon for levels 30 to 120, available during its event. Bring the event ticket matching your level and Elemental progression before entering. Available when the corresponding seasonal dungeon event is enabled. Your ticket and encounter band follow your level and, where applicable, Elemental progress. No fixed equipment checklist is assigned to this dungeon. Check the event dungeon panel for the active reward preview. Level 30–120 Players Solo Cooldown 45 minutes Time limit 60 minutes Base daily entries 6 character / 6 device Ticket 1 × matching event-band ticket Damage bonuses Bosses Resistance Earth Abyss of Shadows Enter the Abyss after unlocking Abandoned Fortress. Identify false stones, close guarded portals and stop an intruder before challenging the Emperor of the Abyss and his healers. Requires Abandoned Fortress access; Solo or exactly 2 players. Find 3 real stones among 5, close 4 portals and stop the intruder within its 45-second route. The moving shadow zone applies -50% outgoing damage for 10 seconds after a 2-second dwell. The Emperor locks phases at 75% and 50%; each healer restores 2% every 5 seconds. Use the Solo or Duo equipment checklist before entering. View the final boss's upgrade materials and current rewards in the drop preview. Level Champion 1–30 Players Solo or exactly 2 Cooldown 45 minutes Time limit 60 minutes Base daily entries 6 character / 6 device Ticket 1 × Yohara Dungeon Ticket Damage bonuses Bosses Resistance Darkness Unlock Abandoned Fortress Storm Sanctuary Enter Storm Sanctuary after unlocking Nam Gwang. Follow the compass, attack shifting stones and protect the Wind Warrior before the Stormhide Colossus unleashes guardians and pursuing tornadoes. Requires Nam Gwang access; Solo or exactly 2 players. Four compass objectives lead to wind crystals, hunting circles and shifting stones. Shifting stones share 14 million base HP and change target every 5 seconds. Protect the Wind Warrior for 45 seconds; final phases start at 75% and 50% boss HP. Use the Solo or Duo equipment checklist before entering. View the final boss's upgrade materials and current rewards in the drop preview. Level Champion 10–30 Players Solo or exactly 2 Cooldown 45 minutes Time limit 60 minutes Base daily entries 6 character / 6 device Ticket 1 × Yohara Dungeon Ticket Damage bonuses Bosses Resistance Wind Unlock Nam Gwang Heart of the Earth Enter the Heart of the Earth after unlocking Yilad Pass. Remember coloured seals, break the Golem Leader's armour and defeat the Ancient Earth Guardian through its crystal and bodyguard phases. Requires Yilad Pass access; Solo or exactly 2 players. Memorise 4 coloured seals; after two failed attempts, defeat the final penalty wave to advance. Break the Golem Leader's armour, then follow the marked guardian as it changes every 10 seconds. At 75% HP, identify 4 real crystals among 5; the fake costs 50% of your maximum HP. Use the Solo or Duo equipment checklist before entering. View the final boss's upgrade materials and current rewards in the drop preview. Level Champion 20–30 Players Solo or exactly 2 Cooldown 45 minutes Time limit 60 minutes Base daily entries 6 character / 6 device Ticket 1 × Yohara Dungeon Ticket Damage bonuses Bosses Resistance Earth Unlock Yilad Pass Citadel of Frost Enter the Citadel after unlocking Northwind Canyon. Keep warm, fire the cannons and protect the Ice Warrior before confronting the Frost Guardian King's chains, reflections and curses. Requires Northwind Canyon access; Solo or exactly 2 players. Campfire warmth restores 4 temperature per second; outside it, temperature falls by 2. Use 2 cannon charges, protect the Ice Warrior for 59 seconds and break the throne stones in order. Final phases use chains, 2 reflections at 75% HP, then curses at 50% and 25%. Use the Solo or Duo equipment checklist before entering. View the final boss's upgrade materials and current rewards in the drop preview. Level Champion 30 Players Solo or exactly 2 Cooldown 45 minutes Time limit 60 minutes Base daily entries 6 character / 6 device Ticket 1 × Yohara Dungeon Ticket Damage bonuses Bosses Resistance Ice Unlock Northwind Canyon Enigma · Easy Prepare for Easy Enigma with the matching ticket and equipment tier. Its six trials share the dungeon's combat restrictions, daily limit and server-midnight reset. Triton-tier +9; Black Steel-tier armour +9. Heaven's Tear +9, Phoenix Shoes +9, Linen Belt +9. Activate a Basic Energy Crystal and meet the 19% sash requirement. Leadership P. No ring or aura minimum. Medium and Hard worn-equipment alternatives are accepted; other Easy checks still apply. Level 90–120 Ticket 1 × Beginner Enigma Ticket Sash absorption 19% Time limit 60 minutes Enigma · Medium Prepare for Medium Enigma with the matching ticket and equipment tier. Its six trials share the dungeon's combat restrictions, daily limit and server-midnight reset. Rune-tier +9; Magma Glow-tier armour +9. Dragon helmet, Titan shield, Ruby accessories, Qilin shoes and King's Belt +5. Activate an Advanced Energy Crystal and meet the 25% sash requirement. Leadership, Scales Of Dragon and Soul Of Dragon P. Power of Fire Ring. Hard worn-equipment alternatives are accepted; other Medium checks still apply. Level 90–120 Ticket 1 × Advanced Enigma Ticket Sash absorption 25% Time limit 60 minutes Enigma · Hard Prepare for Hard Enigma with the matching ticket and equipment tier. Its six trials share the dungeon's combat restrictions, daily limit and server-midnight reset. Kyanite weapons and armour +5. Dragon helmet, Titan shield, Ruby accessories, Qilin shoes and King's Belt +9. Activate an Elite Energy Crystal and meet the 25% sash requirement. Leadership, Scales Of Dragon and Soul Of Dragon P. Power of Fire and Power of Ice rings. Any of the six elemental talismans at +0 meets the pendant minimum. Level 90–120 Ticket 1 × Expert Enigma Ticket Sash absorption 25% Time limit 60 minutes Enigma · Master Prepare for Master Enigma with the matching ticket and equipment tier. Its six trials share the dungeon's combat restrictions, daily limit and server-midnight reset. Kyanite weapons and armour +9. Kyanite helmet, shield, accessories, shoes and belt +9. Activate an Elite Energy Crystal and meet the 30% sash requirement. Leadership, Scales Of Dragon and Soul Of Dragon P. Both power rings; Kyanite Divine Aura. Requires a Zodiac Sash (Legendary) and all 9 PvP passive-tree nodes. Level 120 Ticket 1 × Master Enigma Ticket Sash absorption 30% Time limit 60 minutes